Thursday, November 1, 2007

Apple โทรศัพท์มือถือ iPhone


Apple โทรศัพท์มือถือ iPhone
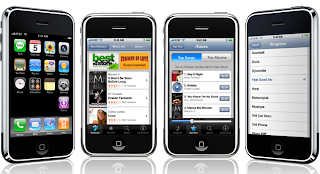
Apple เปิดตัว iPhone โทรศัพท์มือถือที่ออกมาในแบบ PDA ตัวเครื่องขนาดบาง หน้าจอสัมผัสขนาดใหญ่ เหมาะสมกับการใช้งานอินเตอร์เน็ต รับ - ส่งอีเมล เต็มตากับการชมวีดีโอ และยังคงไม่ทิ้งคุณสมบัติเครื่องเล่นเพลง ที่ควบคุมการเล่นเพลงด้วยปลายนิ้วสัมผัสบนหน้าจอ

ผู้ใช้สามารถทำการโทรออกได้จากรายชื่อในสมุดโทรศัพท์ หรือบันทึกรายการโทร มีฟังค์ชั่นตัดเสียง (Mute) สนทนาผ่านลำโพง (Speaker phone) ในส่วนของการส่งข้อความก็สะดวกในการพิมพ์ด้วยคีย์บอร์ดเสมือนจริงบนหน้าจอแบบ QWERTY
ท่องโลกอินเตอร์เน็ตกับ Safari browser แสดงได้เต็มหน้าเว็บเพจพร้อมฟังค์ชั่นการซูม ที่ควบคุมได้แค่ปลายนิ้ว iPhone ยังเป็นเพื่อนร่วมทางที่ดี เพราะมี Google Maps แสดงแผนที่ และภาพถ่ายดาวเทียม พร้อมรับข้อมูลทางด้านการจราจร นอกจากนี้ยังมี Widgets ที่คอยรายงาน สภาพภูมิอากาศให้คุณแบบ Real time
ข้อมูลตัวเครื่อง iPhone
-จอแสดงผล ระบบสัมผัส (Multi-touch) ความละเอียด 320 x 480 พิกเซล กว้าง 3.5 นิ้ว
-ระบบปฏิบัติการ Mac OS X
-หน่วยความจำในตัว 4 กิ๊กกะไบต์ หรือ 8 กิ๊กกะไบต์
-เครือข่าย GSM Quadband 850/900/1800/1900 MHz
-การเชื่อมต่อ Wireless LAN 802.11b/g, EDGE, Bluetooth™ 2.0
-กล้องดิจิตอล ความละเอียด 2 ล้านพิกเซล
-การใช่งานแบตเตอรี่- สนทนา/ชมวีดีโอ/ใช้งานอินเตอร์เน็ต : 5 ชั่วโมง- ฟังเพลงนานต่อเนื่อง 16 ชั่วโมง
-ขนาดตัวเครื่อง 115 x 61 x 11.6 มิลลิเมตร - น้ำหนัก 135 กรัม

Read More......

Monday, October 29, 2007

Tips Windows Vista


Tips Windows Vista
Tips Configure Windows Vista
-1--------------------------------------------
Configuring UAC
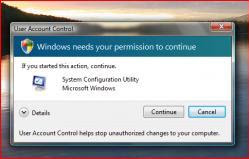
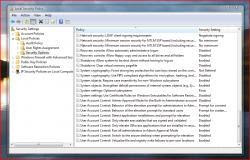
To configure UAC options, either run 'Local Security Policy' from Admistrative Tools, or enter secpol.msc in the Start Menu Search Bar and press Enter.
1.1. Disable switching to the Secure Desktop for UAC prompts:
Security Settings->Local Policies->Security Options ->
User Account Control: Switch to the secure desktop when prompting for elevation - Set to Disabled
Now, when you get UAC prompts, the screen won't go grey, the UAC prompts will use the Aero theme, and you can still operate many other programs without needing to respond to the UAC prompt:
1.2. Change UAC behaviour
Security Settings->Local Policies->Security Options ->
User Account Control: Behaviour of the elevation prompt....
You can configure UAC to either:
(Administrators:)
- Elevate without prompting
- Prompt for Consent
- Prompt for Credentials
(Standard Users):
- Prompt for Credentials
- Automatically deny elevation requests.
Using this setting, you can control how much of an intrusion UAC is without completely turning it off.


-2--------------------------------------------
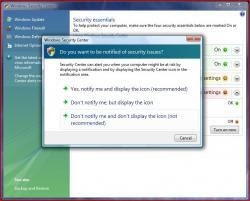
Disable Security Center Notifications
To disable the red or yellow icon in the tray and the balloon notifications (Such as "UAC Is Turned Off" or "No Anti-Virus Detected") Go to the Control Panel. Now go to Security and then Security Center. Now in the left side panel you will see "Change the way Security Center alerts me". In the window that opens up, select "Do not notifiy me and do not display the icon"

-3--------------------------------------------
Windows Vista Keyboard Shortcuts
A full list of keyboard shortcuts in Windows Vista can be found here: http://windowshelp.microsoft.com/Windows/e...8dc5661033.mspx

-4--------------------------------------------
Enable Aurora Bootscreen
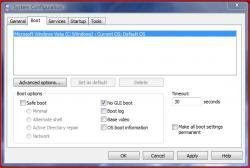
In the start menu search box, type "msconfig" and press enter. In the window that appears, go to the Boot tab. In the Boot Options section at the bottom, check the box next to "No GUI Boot" and click Ok. Now the next time you boot up, you will have the "Aurora Bootscreen".

-5--------------------------------------------
Configure the start menu power button to Shut Down
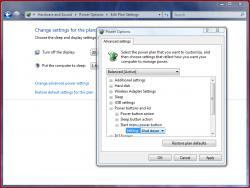
First, open the Control Panel, select "Hardware and Sound" and then "Power Options". Now in the left side panel, select "Change when my computer sleeps". Now click "Change Advanced Power Settings". In the window that opens up, go down to Power Buttons and Lid and expand it. Now select "Start Menu power button" and change the setting to "Shut Down" and click Ok.

-6--------------------------------------------
Quick Find a program in the Start Menu
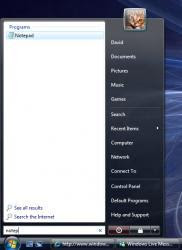
To quickly find a program in the start menu, just type in the first few charaters of the program's name in the Search Bar located at the bottom of the new start menu. Then, the program which closest resembles the characters you entered will be automatically selected. In this example, I have searched for notepad by only entering the first few characters:

-7--------------------------------------------
Enable Administrator Acount
Right click on ''Computer -> Manage -> Local Users and Groups -> Users-> Rightclick Administrator -> Properties -> Uncheck ''Acount is disabled''.If you want your Administrator acount as the only primairy acount.Rightclick on Your Username -> Delete.
With the Administrator Acount you don't have UAC or any other things you can't change or edit. Full Privileges

-8--------------------------------------------
Enable Classic(ish) Logon Style
In the start menu, type "secpol.msc". In the window that opens up, on the left side navigational menu, select "Local Policies" and then "Security Options". Scroll down to "Interactive Logon: Do not display last user name" and set it to Enabled.
Thank : http://www.jcxp.net

Read More......
Sunday, October 28, 2007

รู้จัก Registry ก่อนเข้าเจอะระบบ (ตอนที่ 1)

Registry คือฐานข้อมูลส่วนกลางที่มีความสำคัญสำหรับ Windows เป็นอย่างยิ่งเพราะข้อมูลแทบทุกอย่างไม่ว่าจะเป็น ข้อมูลด้าน ฮาร์ดแวร์ ซอฟต์แวร์การปรับแต่งค่าต่าง ๆ หรือแม้กระทั่งรหัสผ่าน สิ่งเหล่านี้ล้วนถูกบรรจุอยู่ใน Registry ทั้งหมด
Registry จึงมีผลต่อเสถียรภาพของ Windows หากมีข้อผิดพลาดเกิดขึ้นใน Registry เพียงแห่งเดียว ก็อาจส่งผลให้ Windows ทำงานผิดเพี้ยนหรือล่มไปทั้งระบบก็เป็นได้ ดังนั้นการที่เราจะสามารถควบคุม Windows ได้เหนือผู้ใช้งานทั่วไป การปรับแต่ง Registry จึงเป็นสิ่งจำเป็นที่จะต้องเรียนรู้

หน้าที่ของ 6 คีย์หลักใน Registry ภายใน Registry จะประกอบด้วยคีย์หลัก 6 คีย์ ด้วยกัน ซึ่งแต่ละคีย์ก็ล้วนเชื่มต่อข้อมูลกับไฟล์ System.dat และ User.dat โดยแต่ละคีย์จะมีหน้าที่ดังนี้

HKEY_CLASSES_ROOT เป็นคีย์สำหรับจัดเก็บข้อมูลและคุณสมบัติต่าง ๆ ที่เกี่ยวข้องกับซอฟต์แวร์ทั้งหมดที่ติดตั้งภายในเครื่อง

HKEY_CURRENT_CONFIG เป็นคีย์สำหรับจัดเก็บข้อมูลที่เกียวกับการกำหนดค่าต่างๆ ของฮาร์ดแวร์หรืออุปกรณ์ต่อพ่วงทั้งหมด

HKEY_LOCAL_MACHINE เป็นคีย์สำหรับจัดเก็บข้อมูลทางด้านฮาร์ดแวร์ ซอฟต์แวร์ และการตั้งค่าอื่น ๆ ภายในเครื่องคอมพิวเตอร์ ข้อมูลภายในคีย์จะนำไปใช้กับผู้ใช้ทุกคนที่เข้ามาในวินโดวส์

HKEY_USERS เป็นคีย์สำหรับจัดเก็บข้อมูลเฉพาะที่เกี่ยวกับผู้ใช้ทั้งหมดเช่นรายชื่อของผู้ใช้ที่เข้ามาใช้งานหรือรายชื่อผู้ใช้งานเครือข่าย โดยจะมีความสัมพันธ์และเป็นข้อมุลชุดเดียวกับคีย์ HKEY_CURRENT_USER

HKEY_CURRENT_USER เป็นคีย์สำหรับจัดเก็บข้อมูลเฉพาะที่เกี่ยวกับผู้ใช้ปัจจุบันที่เข้ามาใช้งานเท่านั้น โดยจะมีความสัมพันธ์และเป็นข้อมูลชุดเดียวกับกับคีย์ HKEY_USERS

HKEY_DYN_DATA เป็นคีย์สำหรับจัดเก็บข้อมูลที่เกี่ยวกับการตั้งค่าในระบบ Plug and play รวมถึงค่ารหัสต่าง ๆ ของอุปกรณ์ที่มาต่อพ่วง สำหรับใน Windows XP จะไม่ปรากฎคีย์นี้
ความเป็นมาและไฟล์สำคัญของ Registry
ในสมัย Windows 3.X การจัดเก็บฐานข้อมูลส่วนกลางสำหรับ Windows ในรูปแบบของ Registry ยังไม่เกิดขึ้น แต่จะใช้ ไฟล์นามสกุล .ini ชนิด Text file เช่น WIN.INI คอยเก็บข้อมูลที่เกี่ยวกับระบบและค่าต่างๆ ของ Windows แทนแต่ก็มีข้อจำกัดมากมาย เช่น ทำงานได้ช้า ไฟล์จะมีขนาดใหญ่เกินกว่า 64 KB ไม่ได้ การค้นหา และการจัดระเบียบต่าง ๆ ภายในไฟล์ก็ทำได้ไม่ดีนักต่อมาใน Windows 95/98/ME/2000/NT จนถึง XP ทาง Microsoft จึงได้มีการเปลี่ยนแปลงการจัดเก็บข้อมูลส่วนกลางของ Windows ในรูปแบบของโปรแกรม Registry ซึ่งทำให้ข้อจำกัดต่างๆ ที่เกิดขึ้นในอดีตหมดไป โดย Registry จะประกอบด้วยไฟล์สำคัญ ดังนี้
SYSTEM.DAT สำหรับจัดเก็บข้อมูลทั้งฮาร์ดแวร์และซอฟต์แวร์ที่ติดตั้ง อยู่ภายในเครื่อง รวมไปถึงค่าต่าง ๆ ของระบบ Windows โดยข้อมูลทั้งหมดจะถูกโปรแกรม Registry นำไปใช้มนคีย์ที่ชื่อ HKEY_CLASSES_ROOT , HKEY_LOCAL_MACHINE , HKEY_CURRENT_CONFIG ,HKEY_DYN_DATA

USER.DAT สำหรับจัดเก็บข้อมูลต่าง ๆ ของผู้ใช้แต่ละคน รวมไปถึงหน้าตาและการแสดงผล ของ Windows ด้วยเช่น หน้าจอเดสก์ทอป Registry นำไปใช้ในคีย์ชื่อ HKEY_USERS , HKEY_CURRENT_USER
สำหรับใน Windows Me ทาง Microsoft ได้แยกข้อมูลบางส่วน (ส่วนที่เป็น CLASS OBJECT) ออกมาเก็บไว้อีกไฟล์ ซึ่งมีชื่อว่า CLASSES.DAT

โดยเราสามารถค้นหาไฟล์ทั้ง 3 ได้ ดังขั้นตอนต่อไปนี้
1. ไฟล์ทั้ง 3 เป็นไฟล์ที่มีความสำคัญต่อระบบ ดังนั้นจึงไม่ได้ปรากฎให้เป็นเหมือนไฟล์ปกติทั่วไป ก่อนอื่นเราต้องเข้าไปกำหนดให้ Windows แสดงไฟล์ที่ถูกซ่อนทั้งหมดออกมาเสียก่อน โดยเข้าดูไปที่หน้าต่าง c:\windows
2. คลิกเมนู Tool > Folder Options
3. เมื่อปรากฎหน้าต่าง Folder Options ให้คลิกแท็บ View
4. คลิกเลือกช่อง Show hidden files and folders
5. คลิกปุ่ม OK
6. จากนั้นไฟล์สำคัญที่ถูกซ่อนอยู่จะปรากฎให้เห็น ซึ่งรวมถึงไฟล์ SYSTEM.DAT, USER.DAT และ CLASES.DAT ด้วย
7. สำหรับไฟล์ USER.DAT ที่แสดงใน C:\WINDOWS จะเป็นไฟล์ที่เก็บข้อมูลส่วนกลางของผู้ใช้แต่ละคนในขณะที่มีการ Logoff ออกจากระบบ แต่ไฟล์ USER.DAT ที่เก็บข้อมูลเฉพาะของผู้ใช้แต่ละคนจะอยู่ที่
C:\WINDOWS \Profiles\โฟล์เดอร์ที่เป็นชื่อของผู้ใช้แต่ละคน

Read More......